Master African Violet Propagation: Unlock a World of New Blooms
African Violets, with their velvety leaves and vibrant, jewel-toned blossoms, are among the most cherished houseplants. Their captivating beauty often inspires a desire to expand one's collection or share the joy with others. While the thought of creating new plants from an existing one might seem daunting, learning
how to propagate African Violets is surprisingly straightforward and incredibly rewarding. Many gardeners, initially intimidated by these delicate beauties, find that once they grasp the fundamentals of care, propagation becomes the logical and exciting next step. This comprehensive guide will demystify the process, revealing the crucial secrets of humidity and light that lead to thriving new African Violet plantlets.
Why Propagate African Violets? Expand Your Collection with Ease
The primary allure of African Violet propagation lies in its ability to multiply your beloved plants without needing to purchase new ones. Imagine transforming a single healthy leaf into an entire cluster of new, blooming violets! This offers numerous benefits:
*
Expand Your Collection: Easily grow dozens of your favorite varieties, filling your home with more color and life.
*
Share the Beauty: Propagated plantlets make thoughtful and cherished gifts for friends and family.
*
Save Money: Why buy new plants when you can create them from what you already have?
*
Rejuvenate Older Plants: Sometimes, an aging African Violet can be given a new lease on life by propagating its healthy leaves.
*
Preserve Rare Varieties: If you have a unique or hard-to-find African Violet, propagation is an excellent way to ensure its legacy.
*
The Joy of Growth: There's immense satisfaction in nurturing a tiny leaf cutting into a robust, flowering plant.
Gathering Your Propagation Arsenal: Essential Supplies for Success
Before you begin, gathering the right tools will set you up for success. Having everything ready ensures a smooth and sanitary process.
*
Sharp, Sterile Cutting Tool: A clean, sharp knife or a pair of small, pointed scissors. Sterilizing your tool with rubbing alcohol before each cut is crucial to prevent the spread of diseases.
*
Small Containers: Yogurt containers, seedling trays, or small plastic cups work perfectly. The key is size – you don't need much space for a single leaf cutting. Ensure these containers have drainage holes at the bottom to prevent waterlogging. If they don't, carefully poke a few small holes yourself.
*
Lightweight Potting Mix: A specialized African Violet potting mix or a good quality, very light seed-starting mix is essential. Avoid dense, heavy garden soil, as it retains too much moisture and can lead to rot. The mix should be airy, allowing for good drainage and oxygen circulation around the developing roots.
*
Humidity Dome or Plastic Bag: This is a critical component for creating the high-humidity environment African Violets crave during propagation. Clear plastic bags, clear plastic containers, or dedicated humidity domes are all effective.
*
Water: Room temperature water is best. If your tap water is heavily chlorinated, consider letting it sit out for 24 hours or using distilled/rainwater.
The Leaf Cutting Method: Your Step-by-Step Guide to New African Violets
The leaf cutting method is the most popular and reliable way to propagate African Violets. It's a straightforward process that yields excellent results when done correctly.
Step 1: Selecting the Perfect Parent Leaf
The success of your propagation largely depends on choosing the right leaf. Look for a healthy, mature leaf from the middle row of your adult African Violet plant. These leaves have the ideal balance of vigor and stored energy. Avoid very young leaves (they lack the energy) or very old, outer leaves (they may be less vital or prone to rot). The chosen leaf should be firm, vibrant in color, and free from any blemishes, spots, or signs of disease.
Step 2: Making the Clean Cut
Using your sterilized sharp knife or scissors, carefully cut the leaf stem (known as the petiole) at a 45-degree angle. The stem should be about 1 to 1.5 inches long. A diagonal cut increases the surface area for root formation, giving your new plantlets a better chance to emerge. Make sure the cut is clean and decisive, avoiding any crushing or tearing of the stem.
Step 3: Preparing the Potting Medium
Fill your small container with the moist, lightweight seedling or African Violet potting mix. The mix should be damp, but not soggy – think of a wrung-out sponge. Gently make a small indentation in the center of the mix where the leaf stem will be planted.
Step 4: Planting the Leaf
Insert the cut end of the leaf stem into the prepared potting mix, at a slight angle, so that the leaf blade is just above the soil surface. Gently firm the soil around the stem to ensure good contact. You can place multiple leaf cuttings in a larger container, but ensure they have enough space not to touch each other. For a more detailed look at the process, explore our guide on
Grow African Violets from Cuttings: A Step-by-Step Guide.
Step 5: Initial Watering
After planting, give the cutting a light drink of water. You can water carefully from the top, ensuring not to dislodge the leaf, or use bottom-watering by placing the container in a shallow tray of water for a few minutes until the top soil becomes moist. Remember, African Violets do not like to sit in saturated soil, so avoid overwatering.
The Critical Environment: Humidity & Light Secrets for Thriving Plantlets
This is where the "secrets" of successful African Violet propagation truly come into play. Creating the perfect microclimate is paramount for root and plantlet development.
Humidity: The Breath of Life for Cuttings
African Violets thrive in environments with high humidity, mimicking their natural habitat in the cloud forests of East Africa. For propagation, high humidity prevents the leaf cutting from drying out while it focuses its energy on developing roots.
*
The Plastic Bag Method: Place your potted leaf cutting inside a clear plastic bag. Gently seal the bag, or use elastic bands, to create a miniature greenhouse effect. Ensure the bag doesn't touch the leaf directly. You can cut the bag to size if needed.
*
Humidity Domes & Terrariums: A clear plastic humidity dome or a small, enclosed terrarium works wonderfully. For a DIY terrarium, place a layer of pebbles at the bottom, add a small amount of water (ensure the pot itself doesn't sit directly in the water, but rather on the pebbles), and then place your potted cutting on top. A clear lid then covers the entire setup. This method allows the water to evaporate, creating ambient humidity around the plant.
*
Crucial Tip: Air Circulation: Even within a humid environment, a little air circulation is vital. If using a sealed bag or dome, open it briefly once a week to allow fresh air in and prevent fungal issues. For terrariums, a few small holes in the lid can provide adequate ventilation.
Light: The Gentle Nurturer
While humidity is about moisture, light is about energy. Young African Violet cuttings need bright, indirect light to photosynthesize and fuel their growth without scorching their delicate leaves.
*
Bright, Indirect Light is Key: Place your propagation setup in a location that receives ample ambient light but no direct sun. A north-facing window is often ideal. If using an east or west-facing window, place the cuttings a few feet back from the glass or use a sheer curtain to diffuse the light.
*
Avoid Direct Sunlight: Intense, direct sunlight will quickly burn the sensitive leaf cutting, turning it brown and effectively ending your propagation attempt.
*
Grow Lights: If natural light is insufficient, fluorescent grow lights (LED or T5/T8) placed about 10-12 inches above the cuttings can provide excellent, consistent illumination for 12-14 hours a day.
Temperature: The Unsung Hero
While humidity and light are paramount, maintaining a stable, warm temperature is equally important. African Violets prefer temperatures between 65-75°F (18-24°C) for optimal growth and propagation. Avoid cold drafts or extreme temperature fluctuations, which can stress the cutting.
The Waiting Game: Care and Development of Your New African Violets
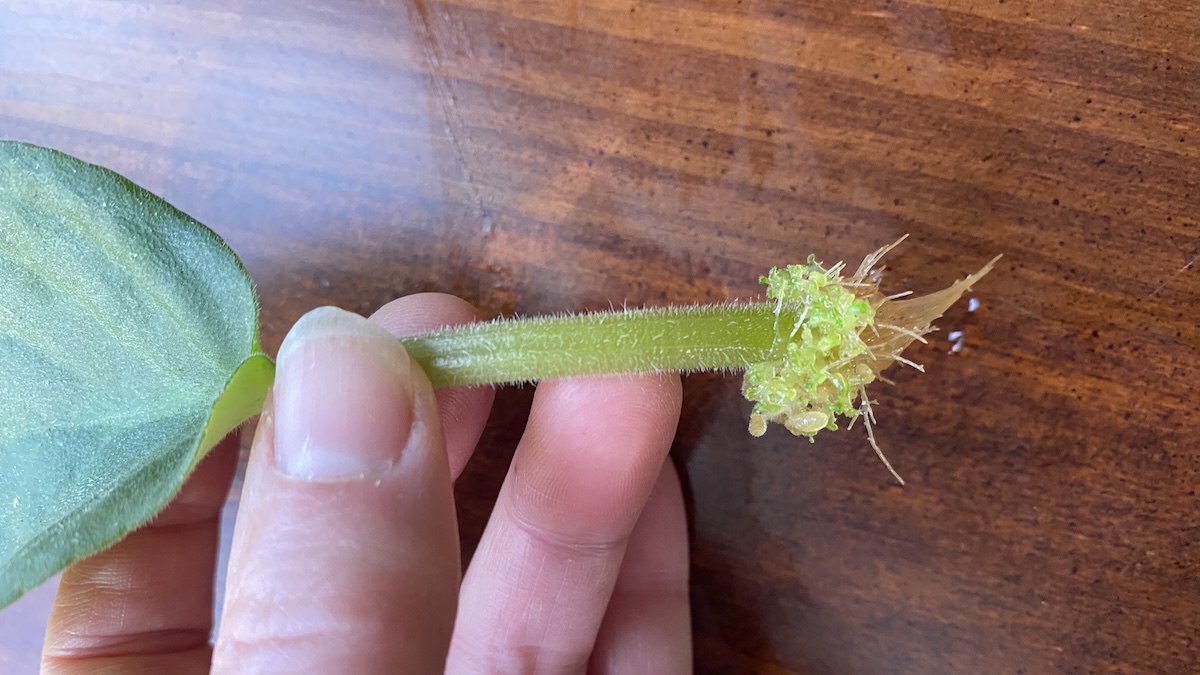
Patience is a virtue in African Violet propagation. It typically takes 3 to 8 weeks for tiny plantlets to emerge at the base of the leaf stem.
*
Monitor Moisture: Periodically check the soil moisture within your humid enclosure. While the humidity dome reduces water loss, the soil should remain lightly moist. Water sparingly when the top inch feels dry, always avoiding waterlogging. Remember, the goal is humidity in the air, not saturated soil.
*
Spotting Plantlets: Don't be discouraged if you don't see immediate results. Tiny green bumps will eventually appear at the base of the leaf stem. These are your new plantlets!
*
Transitioning Plantlets: Once your plantlets have developed 2-3 small leaves and are about an inch or two tall, it's time to gradually acclimatize them to lower humidity. Start by opening the plastic bag or dome for a few hours each day, gradually increasing the duration over a week or two. This "hardening off" process prepares them for life outside the high-humidity environment.
*
Transplanting: When the plantlets are robust enough (and ideally have a few leaves of their own), carefully separate them from the parent leaf. Gently tease apart the individual plantlets, ensuring each has some roots. Pot each plantlet into its own small container with fresh African Violet potting mix. The parent leaf, if still healthy, can often be replanted to produce another batch of plantlets! For more comprehensive methods and tips on encouraging abundant blooms, refer to our article on
Propagate African Violets: Easy Methods for More Blooms.
Conclusion: Embrace the Joy of African Violet Propagation
Learning
how to propagate African Violets opens up a world of horticultural possibilities. By mastering the simple leaf cutting technique and paying close attention to the critical environmental factors of humidity and light, you can easily multiply your favorite plants. From a single leaf, you can cultivate a thriving collection, share the beauty with loved ones, and experience the immense satisfaction of nurturing new life. So, sterilize those scissors, prepare your soil, and embark on your African Violet propagation journey – a green thumb adventure awaits!